
Make Professional Resume In Just 5 Min | Bio Data Kaise Banate Hai | By Techno Bipu (Hindi)
 |
The first thing you need when you apply for a job in a company or a government portal is CV or biodata.
When you apply for a job on an online portal, you need to upload CV or biodata in PDF format. And if it's offline, When you go for an interview in a private or government office offline, you are asked to carry your resume with you. For this you need to make a CV or biodata from an online shop and for this you have to charge some money.
And you don't need a computer or desktop to create your CV or biodata. You can easily create a biodata through your mobile after reading this article to the end.
So today in the article I am going to tell you how you can make a biodata or CV through your mobile.
You can watch the video format if you want this process. See video format
So let's find out.
The first thing you need to do is to download the Google Docs application.
 |

After this app is downloaded open this app. Note also that if you have any 'Word View or MS Word' application on your phone then there is no need to download this 'Google Docs' app.
After downloading the app, if you open it for the first time you may need to sign up with your mail id. After completing the sign up, this app will open completely.
You may need to prepare a format to make biodata after you are open, but I have given you the link of that format below, so you don't need to prepare or make any more format.
 |

You can easily create a biodata or CV through this format. And you can change everything as you like.
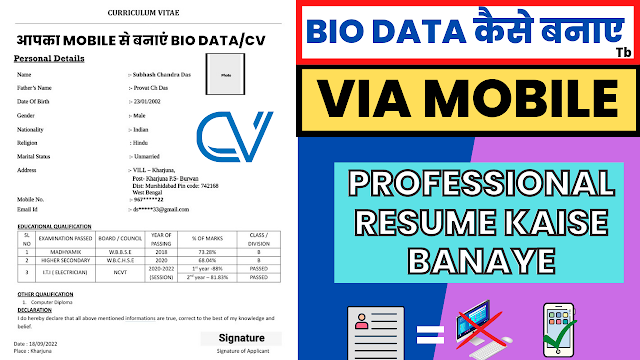
In this format you will see your 'Personal Details, Educational Qualification, Other Qualification, Declaration, Date, Place, Signature' etc. You can also add your photo and signature photo very easily.
 |
Here in Personal Details you will fill your own details. I've filled out everything in the demo to show you here.
In educational qualification you will fill your board, passing of year, division etc. correctly.
If you want, you can also add graduation here. In place of ITI can write Graduation or BA, Then you will see first year and second year instead of percentage or marks, here you need to add another table.
To add a table you need to select or touch the first year table. Then you need to add a table below.
Then you can easily add another year here.
Declaration No need to change the declaration, can keep what is there
you can easily add or delete photos and signature photos. You can add your passport size photo here.
Hope you have benefited a lot from this article. If you find it difficult to understand, then you can watch this process in video format from our YouTube channel.
Thank you so much for reading this post till the end.
Support Us:-
YouTube:- https://youtube.com/c/TechnoBipu
Facebook:- https://m.facebook.com/technobipu
Twitter:- https://twitter.com/technobipu
Insta:- https://instagram.com/technobipu
